IMAGEN 1: Esquema de led RGB, notese las distintas entradas controladoras de cada espectro de color.
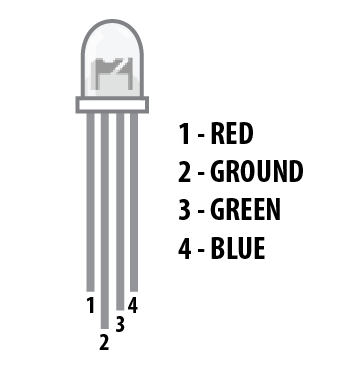
El circuito comprende la posibilidad de excitar cada entrada del Led independientemente, por medio de distintos pines de salida de la placa Arduino.
Materiales:
1x Arduino Uno
1x Protoboard
1x LED - RGB Catodo
3x 330Ω Resistencia
5x Cables tipo jumper
IMAGEN 1, La segunda entrada del Led se conecta a GND, mientras que la primera, tercera y cuarta entrada se conectan con los pines 9,10,11 del Arduino respectivamente. Atención a que cada entrada incluye una resistencia fija de 330 ohms.

El código que programa la incidencia de cada canal es el siguiente:
const int RED_PIN = 9;
const int GREEN_PIN = 10;
const int BLUE_PIN = 11;
const int DISPLAY_TIME = 1000; // used in mainColors() to determine the
// length of time each color is displayed.
void setup() //Configure the Arduino pins to be outputs to drive the LEDs
{
pinMode(RED_PIN, OUTPUT);
pinMode(GREEN_PIN, OUTPUT);
pinMode(BLUE_PIN, OUTPUT);
}
void loop()
{
mainColors(); // Red, Green, Blue, Yellow, Cyan, Purple, White
// showSpectrum(); // Gradual fade from Red to Green to Blue to Red
}
/******************************************************************
* void mainColors()
* This function displays the eight "main" colors that the RGB LED
* can produce. If you'd like to use one of these colors in your
* own sketch, you can copy and paste that section into your code.
/*****************************************************************/
void mainColors()
{
// all LEDs off
digitalWrite(RED_PIN, LOW);
digitalWrite(GREEN_PIN, LOW);
digitalWrite(BLUE_PIN, LOW);
delay(DISPLAY_TIME);
// Red
digitalWrite(RED_PIN, HIGH);
digitalWrite(GREEN_PIN, LOW);
digitalWrite(BLUE_PIN, LOW);
delay(DISPLAY_TIME);
// Green
digitalWrite(RED_PIN, LOW);
digitalWrite(GREEN_PIN, HIGH);
digitalWrite(BLUE_PIN, LOW);
delay(DISPLAY_TIME);
// Blue
digitalWrite(RED_PIN, LOW);
digitalWrite(GREEN_PIN, LOW);
digitalWrite(BLUE_PIN, HIGH);
delay(DISPLAY_TIME);
// Yellow (Red and Green)
digitalWrite(RED_PIN, HIGH);
digitalWrite(GREEN_PIN, HIGH);
digitalWrite(BLUE_PIN, LOW);
delay(DISPLAY_TIME);
// Cyan (Green and Blue)
digitalWrite(RED_PIN, LOW);
digitalWrite(GREEN_PIN, HIGH);
digitalWrite(BLUE_PIN, HIGH);
delay(DISPLAY_TIME);
// Purple (Red and Blue)
digitalWrite(RED_PIN, HIGH);
digitalWrite(GREEN_PIN, LOW);
digitalWrite(BLUE_PIN, HIGH);
delay(DISPLAY_TIME);
// White (turn all the LEDs on)
digitalWrite(RED_PIN, HIGH);
digitalWrite(GREEN_PIN, HIGH);
digitalWrite(BLUE_PIN, HIGH);
delay(DISPLAY_TIME);
} // esta es una lista de todos los colores que puede producir el LED según el intervalo correspondiente. Notar que cada valor es digital (binario)
/******************************************************************
* void showSpectrum()
*
* Steps through all the colors of the RGB LED, displaying a rainbow.
* showSpectrum() calls a function RGB(int color) that translates a number
* from 0 to 767 where 0 = all RED, 767 = all RED
*
* Breaking down tasks down into individual functions like this
* makes your code easier to follow, and it allows.
* parts of your code to be re-used.
/*****************************************************************/
void showSpectrum()
{
for (int x = 0; x <= 767; x++)
{
RGB(x); // Increment x and call RGB() to progress through colors.
delay(10); // Delay for 10 ms (1/100th of a second) - to help the "smoothing"
}
}
/******************************************************************
* void RGB(int color)
*
* RGB(###) displays a single color on the RGB LED.
* Call RGB(###) with the number of a color you want
* to display. For example, RGB(0) displays pure RED, RGB(255)
* displays pure green.
*
* This function translates a number between 0 and 767 into a
* specific color on the RGB LED. If you have this number count
* through the whole range (0 to 767), the LED will smoothly
* change color through the entire spectrum.
*
* The "base" numbers are:
* 0 = pure red
* 255 = pure green
* 511 = pure blue
* 767 = pure red (again)
*
* Numbers between the above colors will create blends. For
* example, 640 is midway between 512 (pure blue) and 767
* (pure red). It will give you a 50/50 mix of blue and red,
* resulting in purple.
/*****************************************************************/
void RGB(int color)
{
int redIntensity;
int greenIntensity;
int blueIntensity;
color = constrain(color, 0, 767); // constrain the input value to a range of values from 0 to 767
// if statement breaks down the "color" into three ranges:
if (color <= 255) // RANGE 1 (0 - 255) - red to green
{
redIntensity = 255 - color; // red goes from on to off
greenIntensity = color; // green goes from off to on
blueIntensity = 0; // blue is always off
}
else if (color <= 511) // RANGE 2 (256 - 511) - green to blue
{
redIntensity = 0; // red is always off
greenIntensity = 511 - color; // green on to off
blueIntensity = color - 256; // blue off to on
}
else // RANGE 3 ( >= 512)- blue to red
{
redIntensity = color - 512; // red off to on
greenIntensity = 0; // green is always off
blueIntensity = 767 - color; // blue on to off
}
// "send" intensity values to the Red, Green, Blue Pins using analogWrite()
analogWrite(RED_PIN, redIntensity);
analogWrite(GREEN_PIN, greenIntensity);
analogWrite(BLUE_PIN, blueIntensity);
}
Imágen: El programa hará un incremento en los valores de cada rango de color. Colores secundarios como el púrpura son obtenidos de la proporción intermedia entre 2 rangos.


